Monday, 2 December 2013

The Perfect Christmas Craft: Gilded Bowls

Welcome to December's post. We're feeling thoroughly excited with our Christmas-inspired craft this month. By spending just a few pounds on some simple supplies, you can create an incredible centrepiece.


You will need:
Terracotta Pots


First of all, paint your terracotta pots. You only need a very small amount of paint for each so this is a perfect way of experimenting with different sample pots.


Take your time choosing these colours, as flashes of brightness give the gilding a slightly different appearance to softer neutrals.

Make sure you wiggle the paintbrush into all the gaps.


Step two is to apply your size, which is a type of glue that is designed to stay tacky, even when 'dry', a bit like the back of a Post-It note, only stickier. Using a brush, paint the size wherever you want your gilded finish.


Then comes the magical transformation! You need only wait until the size becomes transparent, which can take as little as fifteen minutes. Here it is half-way through the drying process:


Carefully take one sheet of transfer leaf at a time and press it on, gilded-side down, onto your pot.


Using your finger, or a paint brush, press evenly over the back of the paper. 


Firmly press the gilding paper into all the nooks and crannies. This will ensure that the leaf adheres to the painted surface. Carefully peel back and admire your handiwork!


Repeat this process everywhere that the size was applied. You may need to work over some areas several times to allow full coverage. Once the pot is covered to your satisfaction, rub your finger, or a clean paintbrush, gently but evenly, over the gilded surface to help detach any loose bits of leaf.


Gilded surfaces need sealing so we used Liberon's Fine Paste Wax in Clear to give a long-lasting finish..


Enjoy experimenting with different finishes for some truly stunning results. Relics of Witney sells Variegated leaf in different finishes, as well as brass, copper and gold. Contact us for more information.


On one of our pots, we applied variegated leaf solely to the inside surface, and on the other we created the reverse effect. It's worth paying extra attention to the edges for a more professional finish.


Merry Christmas from all of us here at Relics of Witney!

Enter your email address:

to subscribe to Relics of Witney

Friday, 1 November 2013

How To Use Little Greene's Grey Paint Collection

Little Greene have just released a whole new collection devoted entirely to greys. Grouped in four gradated families, each is based on one of four naturally occurring pigments: Verdigris, Umber, Ochre and Red Oxide.

LTCGrey7 28 Shades Of Grey

We've put together our own design boards to show you how well these paints can be paired with Little Greene's existing wallpaper range.


Let's start with Grosvenor Street from London Wallpapers III, in the Alchemy colourway, shown above with one of our gilded pots painted using Lamp Black.


Little Greene Grosvenor Street from London Wallpapers III, a stunning wallpaper featuring a dark charcoal background with metallic burnt silver, stone and white; this charcoal palette works well with modern furniture which leaves plenty of space for the wallpaper to take centre stage; try with Little Greene Loft White, Portland Stone and Lamp Black.


Little Greene Furrow, a deep taupe, partners well with Pines in Golde from Little Greene Oriental Papers (gilded pot in Furrow).


Clockwise from top: An elegant period front door in taupe with black details, take a look at our our beeswaxed door furniture for a similar period feel;  Little Greene sample pots; a warm grey palette of Little Greene Limestone, True Taupe and Furrow; Pines wallpaper in the Golde colourway; taupe is one of those colours that can move seamlessly from front door to hallway.


Pines wallpaper in Silver Pine partners beautifully with Little Greene Lamp Black and Scree.


Let's move onto the softer charms of the last column in the new Little Greene grey collection.


Clockwise from top: this is a soft look that suits a monochromatic touch; Perennial Grey is a feminine shade with warm undertones. Here we've teamed it with Little Greene's North End Road wallpaper from London Wallpapers III, in Warm Silver, North End Road wallpaper; we suggest using Little Greene Down, Dash Of Soot, Perennial Grey and Knightsbridge.


And finally, Wilton (in Halo) from London Wallpapers III, a gentle stone background with metallic champagne highlights, is teamed with Little Greene Limestone. But, wait....is that a touch of gilding you see?

Come back for December's post for step by step tutorial on how to create this stunning bowl....just in time for Christmas!

Enter your email address:

to subscribe to Relics of Witney

Tuesday, 1 October 2013

How To Make The Most OF Farrow and Ball's New Greys

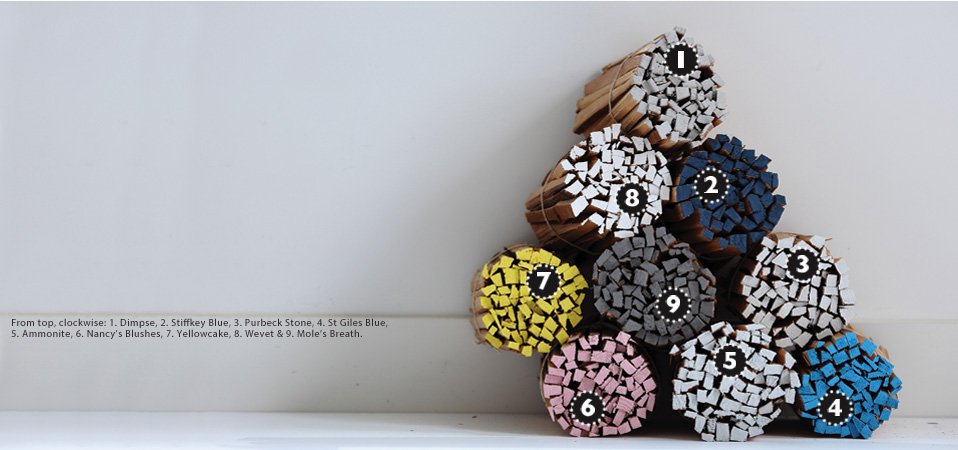
Farrow and Ball have released nine new colours: five beautiful greys, and four brighter hues. This month, we've prepared mood boards to demonstrate how to make these greys work for you and your home.


The greys are, typically of Farrow and Ball, delightfully and quirkily named:

Mole's Breath
Purbeck Stone
Ammonite
Dimpse
Wevet


Clockwise from top: Farrow and Ball's Mole's Breath; a gorgeous dining room, showing how well this moody colour works with our grey rattan chairs (image via Momtoo); try Mole's Breath in an airy conservatory for a more contemporary look (via Roses and Rust); our timelessly classic grey rattan chairs; Farrow and Ball


Try Farrow and Ball Railings for the cupboard colour in the image above, and Farrow and Ball Ammonite for the walls (image via Pinterest). We love the way Farrow and Ball's new greys harmonise so expertly with their existing palette.


Clockwise from top: Farrow and Ball Purbeck Stone; pretty bedroom showing Farrow and Ball's Hardwick White on the cupboards and Cornforth White on the walls (via House To Home); our Rattan baskets, Farrow and Ball Railings, Farrow and Ball Purbeck Stone


Clockwise from top: Farrow and Ball Dimpse; Farrow and Ball Wevet; Farrow and Ball Dimpse; our beautiful cast iron lanterns complement these paler greys; find identical grey rattan chairs at Relics (via Decor Scoop)

And, as always, if you'd like more ideas for your home, or would like to find out extra information about anything listed above, then please don't hesitate to contact us.

Enter your email address:

to subscribe to Relics of Witney

Monday, 2 September 2013

How To Create Farrow and Ball Stripey Chairs

This month, we've been thoroughly inspired by Farrow and Ball's recent brochure cover.


So enthusiastic are we that we've decided to bring you a full tutorial of how to make this charming, slightly shabbied look your own.


You will need:

Wooden Chairs

This is one of those looks that achieves a lot of wow with very little outlay. You get a lot of bang for your buck, as it were. The two sample pots we've chosen are Farrow and Ball India Yellow and Farrow and Ball Blazer and came to a grand total of £7.90. 


Start off by giving each chair a very light sand down. This is because, while we're aiming for a chipped look, it's important to be able to control when and where the paint will flake away. Sanding provides what's called a 'key', which allows the paint to adhere.


Mark off areas to paint using masking tape. On each chair, we created a slightly different effect by masking off different thicknesses of stripes. These are created by simply layering the masking tape strips to block off your desired widths.


Paint the exposed surfaces using one of the sample pots. 


Before the paint is fully dry, remove the masking tape and repeat the process for your second colour. Once the paint has had a chance to set, you can get to work distressing!


Here are three top tips for creating a bespoke time-worn look.

{As always, do contact us for further information. 
We're here to help!}


Don't paint right up to the edges of all the struts. Leave a small gap, then blend in the paint and the bare wood by repeatedly applying, pressing and removing the tape.


Different kinds of tape will pull off varying amounts of paint. Experiment with parcel tape, for example, for a more heavily distressed feel.


And, lastly, vary the stripe width and placement on each chair for a quirky mix and match look.


When you're happy with the level of distressing on each chair, carefully apply clear exterior wood varnish all over the chairs. We used Osmo 410 for a lovely sheen.


...but you can choose from matt or satin varnishes too. 


Enjoy sitting on your stylish new seating arrangement, whilst revelling in the fact that the makeover cost only 
a few pounds!


Enter your email address:

to subscribe to Relics of Witney

Thursday, 1 August 2013

How To Paint A Swedish Style Chair Using Earthborn Paints (Part 2)

In our last post, we took you through the process of how to narrow down the huge amount of inspiration available to help you decide on the final look for your furniture.


 This time, let's focus on HOW to get that look using Earthborn's paint. We'll be walking you through the techniques we used to create our lovely Swedish-style chair.


For the project we're demonstrating, you will need:


The new 750ml size paint pots that Earthborn have released are perfectly suited to this type of small-scale furniture project. We used Nellie, a gentle grey-blue, and Posset, a soft, pure white.


The first step is to sand down your chair to remove any traces of varnish or layers of old paint. If you choose your project with care then this step needn't take too long but, to get a professional finish, it's worth taking the time to do it properly.


Next, apply your paint methodically, on one part of the chair at a time, using simple back-and-forth strokes with your paintbrush to ensure even, smooth coverage.


 This part requires a little bit of thought. Imagine the effect that you would like to end up with, and apply the layers of paint in reverse.


For example, on the main frame of the chair we've simply used Nellie and then sanded gently back in the areas that will receive most wear to reveal touches of the wood underneath.


On the arms and struts, we added a layer of Posset over the top of a dried layer Nellie, so that when we distressed the chair with our sandpaper, we were able to expose hints of the grey paint below.


And, in other places, we rubbed quite firmly with our sandpaper to reveal, not only the Nellie layer, but also the wood beneath.


By painting each part at a time, you'll be able to build up a picture of what you want to achieve more fully, adding more paint here, or sanding a little extra there.


Once you are completely happy with how your chair looks, then apply the protective finish you've chosen. We've used Osmo Polyx Oil Tint for depth and a slight sheen but it's perfectly possible to choose a glossy finish or utterly matte, depending on your preference. Do contact us for advice.


Breathing new life into old pieces of furniture is such a satisfying process. Quite the opposite of high-street buying; you'll end up with a piece that is uniquely yours, which should, by using the right products, last for years and years and years! What could be lovelier?

Enter your email address:

to subscribe to Relics of Witney

LinkWithin